Free Web Counter

Saturday 31 March 2007

31st March.

I have come across a considerable problem. Its not the car, its me... I've lost the drive and enthusiasm I had just two weeks ago and its slowing me down.

Example... I purchased new brake cylinders, shoes, clips, and a handbrake cable the other day but coming to fit them I found the cylinders to be the wrong ones. Well, being duped by the clocks going forward the bloody car shop was closed when I went back at 4:50..... the whole lot is contriving to piss me off with the car... big time.

On a positive note I purchased a box of Budweiser today in Tesco that might take me mind off it. I have also decided to abstain from my Thursday night ritual... a filthy donor kebab. The money saved will fund a digi dash.. maybe!

This week I have tidied the front wiring harness, connecting the rad fan. I've also installed the headlight bar and have been seeking a solution to my quest to mount the indicators under the headlights AKA Caterham style. A suitable solution has been suggested by a fellow enthusiast on the LocostBuilders forum. I will be purchasing my 100 foot length of waste pipe soon....

A few minutes ago I bolted the steering intermediate shaft in for the first time and put the lights out when I saw the link runs about 2" past the oil filter housing on me Zetec engine... Argghhhhh!!! A suitable solution will take a long time thinking....

Looks like a remote filter housing and, while I'm on, an oil cooler are on the cards. May as well do it now as I would need it for the turbo that is lurking on the horizon!


Me thinks its time to get the motor running, presuming it did before! My quest for some 2L cams has proved fruitless so far, and I may just see it through SVA the way it is. Might be a good thing as I plan the turbo conversion to have more PTW ratio than an R500 Caterham!

I tried to fit the front wheel arches as well today but the lack of suitable M12 bolts put paid to that one.

All was not lost however, as B&Q came up with with some healthy tomato plants in 3 variates that wil go in the greenhouse soon. At least we should have a nice crop of toms in September. Hope the car is ready then!!

Tuesday 27 March 2007

27th Quick Update.

Just a quick update. The steering arm and TRE that I wanted to use are too much work. The taper on the rod end is a different taper so it's not worth progressing any further with that one.
The weather seems to have warmed up a bit so I will be cracking on this weekend with the brakes and wiring. Watch this space!

Saturday 24 March 2007

24th March


Absolutely no progress this week due to sub zero temperatures and snow. Wednesday saw -3 on the dash in me tin top that promptly refused to go. I've bought some new glow plugs but I hope thats the last of the winter weather for now. Who said global warming was a bad thing?

My new greenhouse arrived Friday so today I've broke my back putting some concrete footings in for it to stand on. I've buggered the settings on my camera and pictures are coming out with a blue tinge! Ive managed to get a decent picture of the car with the engine and transmission in. it's not touching anything now so I hope its not coming out any more. Fingers crossed!

I'm hoping to purchase a new battery when I get paid next week so I can finish the wiring off and get the body work fitted correctly.

I'm investigating changing the rack arms and extension as I have an arm and track rod end that are same length as the Sierra ones with the extension fitted. The thread were the arm fits into the rack is a M20 so I'm going to try and get it turned down to fit the smaller Sierra thread. Theres no advantage just will look better than having the three piece with the extension and I can get the track rod ends for free!

Sunday 18 March 2007

18th March

4 weeks in now and I've been very busy this weekend. The garden is looking a lot better and my tomato plants are coming on. Just waiting for my new greenhouse to arrive....
On the car front I've spent a small amount of time since sorting the steering but have progressed really well. The engine and box are in after I ground the chassis rail away where it was touching the bellhousing. No dramas, the rail where I ground it down was a blank end with a cap welded on. I took around 10mm off rounding it, and it didn't break through into the tube.


Above is the offending bit of chassis . You can see where the
bellhousing was touching.


One thick bit of weld just to cap it off I must say. This is probably unique to my car as it will in no way affect a bike engined installation.


I moved the brake line up on the other side of the bulkhead and across to the cylinder. There is no way there will be anything contacting it now.

It looks a bit wonky due to being rerouted but nothing too bad and I've secured it with plenty of P clips.

I fitted the bracket and brake fluid cylinder to the front of the bulkhead while I was in that area with the drill.


I fitted the radiator with a bit of a fiddle. The top brackets supplied were no good on one side because of the way the chassis rails are welded so I fabricated some new straight ones out of ali. The bottom mounts were regulation, BUT, I wish I'd done it before fitting the body as drilling and riveting the brackets to the outside of the rail as intended is impossible with the body fitted. Fitting to the inside of the chassis rail and a certain precise bit of bending got them in place and the radiator bolted on. I used M6 bolts to mount the rad as it may need to come off later. I don't intend too, but, you never know!

I've got loads of bits to carry on with, notably more wiring and the brakes. I need to spend some cash to progress now and that will have to wait until pay day. As I've said before I'm skint!!

Thursday 15 March 2007

15th March.


Tuesday saw me down to MNR to correct the rack problem. The problem seems to be there are two different lengths of ali extensions for different uprights and also different length Ford rack arms! Marc turned the extensions down and when I got home they fitted excellently.

Rest day Wednesday waiting for NEDL to come and change our electric meter. I opened the garage door and worked on the car while I waited and some how still managed to miss him! He must have sneaked past to put the leaflet through the letterbox!

A good day, I fitted the front shockers which I thought where too long but they settled down once I had them in. I ordered some P clips off ebay the other night but only needing 3 to hold the front wiring under the scuttle I made some out of a ali strip so I could crack on getting the engine in.

Before too long, around 30 minutes the engine, box and prop shaft where in place. Hmm, why doesn't the left hand engine mount fit? The left side engine extension is pulling the rubber mount towards the engine and not seating correctly. I soon found out the gearbox bellhousing is resting on one of the chassis tubes. Its the one that runs across the bottom of the footwell and is cutout on mine to get the gearbox in. It has been capped and all I can think is that the mounts were made before the chassis was finished off. Its got a big snot of weld on it so I'm thinking about the angle grinder fix at the moment. Problem is its all nicely powered coated and I don't want to spoil it. I'm thinking about it at the moment as I may be able to raise the gearbox mount to clear it.

I said before that I didn't want to keep lifting the engine in and out and it was to be a once only install? Well, its coming out again as the arc of the clutch arm is exactly where my rear brake pipe is and touching it. It will have to be rerouted. I really couldn't have lined it any better to touch if I'd tried!!

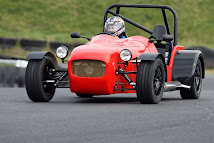
I pushed the car outside to configure the engine install and couldn't resist taking a picture.
1 hour after the above picture it had engine and transmission with the front shocks on as well.

Saturday 10 March 2007

10th March


Its been slow progress this week with challenges and problems to resolve. The lack of bolts for the front suspension was resolved when the ones I ordered from Namrick came Thursday.
The front suspension is on at the moment but with bits of wood for the shocks. The shocks are far too long without the weight of the engine and push the front right up in the air and the wishbones foul the holes in the body I had cut!
Yesterday I dragged the recon brake calipers I had stashed away only to be greeted by an unholy rusty mess.

There was a considerable amount of surface rust coming through the silver paint. Assessing them I discovered that there was rust under the paint as well. The pistons were well pitted around the contact area with the pad. Not a very good recon job at all!
Looking at my original calipers, sitting in red oxide after having been treated to the electrolysis bath many months ago they looked a much better bet.
I popped the pistons out and these too looked in better condition than the 'recon' ones so I decided to use the new seals out of the recon parts in my original donor calipers. A coat of smooth Hammerite and I called it a day.
Today I was waylaid by the MotoGP and got stuck in this afternoon. the Hammerite on my calipers was still tacky so I bunged them in the oven at 130deg for 1 1/2 hours. Sorted, dry and the recon bits gave up their seals. The calipers are ready to go on now but I can't find the original bolts and the ones I have are too long. ARGGHHHHH!!!!!
OK time for the rack to go in, and in it did go. With the rack parts all assembled and fully wound in I still have around 8" toe out which ain't going to go away. More ARGGHHHHH!!!!! A quick call to MNR and they will sort it out. It seems I may have the wrong extensions as there are two types!
I still hope to get the engine in this weekend but I not very optimistic at the moment. Watch this space....

Tuesday 6 March 2007

6th March.

Yesterday I completed the rear suspension with the drive shafts in place. There is some discrepancy between the rear uprights with the nearside needing a spacer between the upright rose joint and the upright but the off side has the rose joint hard up against the bracket.

Also, the bottom wishbones were handed with the top wishbones being symmetrical. The opposite of the description in the manual. With the top bones not being offset my shocks are pushed right forward and are hard against one side of the top bracket under the rollbar. Again there looks to be some discrepancy between the two sides. I'll check it out later in case it's me doing something wrong.

With the drive shafts secure in the diff and the back plates on I temporarily fitted the rear wheels and with some brute force lifted the car down off the trestles its been on since I started.

I worked out the position of the front bottom holes in the body by placing the wishbone on the bench, using it as the edge of the bodywork at an angle to replicate the position it would finally fit into the car. I worked out the front chassis hanger was 2" inside the body and the back one 4". I then placed the bone on the table hanging over the side by the same amount . This gave me the angle of the bone and the distance the two holes needed to be apart. I made a cardboard template to make sure it worked on the bench. After using a set square and ruler I transferred the dimensions onto the outside of the body were I confirmed it to be the same as the template.

After marking measuring, confirming with the template I went for it with the holesaw, fingers crossed. It came out Ok, the holes are in the right place for the arm where it intersects the body and are far enough part to get the bones in.

Bottom arms attached I intended to have the front wheels on but there is a lack of bolts and spacers to get it all together at the moment. I'll be using some rigid struts temporarily in place of the shocks to get it on its wheels

Sunday 4 March 2007

4th March


After buying loads of stuff off eBay this week it all arrived in about 3 days. Hole saw, tiger seal, grommets, convolute tubing, nuts and bolts, whoa neddy! too much spending on eBay! the postage on this lot has nearly doubled the price of the parts

Friday saw me wrapping up the wiring and clipping it to the chassis so I was ready to fit the body Sat. The lack of any helping hands saw me struggle with the one piece body. However I managed to get it on without any damage then set about it making it fit round the roll bar. Well, all I can say is I took too much off and on the offside there is a biggish gap and the body has cracked.... DoH! I think a bit of rubber strip will fill the gap. I wrapped the roll bar with masking tape but there are still some scratches that will need a bit black nail varnish to repair. You really need some body to give you hand but I couldn't wait.

The front of the body was sticking way out the front and the manual says fit the nose cone now, but, where to trim the sides back? I attached the scuttle first then fitted the bonnet give me a datum at the front. It took ages to line the nose cone up and I have a bit of a back down the front on the nearside but I can tidy that up later. I drilled through the nose cone and the side panels into the bracket on the chassis but the sides wouldn't behave, keep popping off at the back and the holes I'd cut from the scribes that are on the sides when you get the body where way to low.

In the end I had to put a couple of packing pieces on top of the brackets to get it to line up and, more importantly I think to unstress the sides.

With some M8 bolts through the scuttle and the nose cone the top of the chassis is secure. I drilled 4mm holes at key points on the underside, tapped them M5 and secure them with 5mm bolts and big load spreading washers. the body was a lot tighter on the offside compared to the nearside which just pushed up to the chassis with no effort.

The fit of the parts are not exactly too my liking but I will fine tune all that when it comes to the final fit.

Next step is to get the suspension on and get the car down onto its wheels for the first time. I should get well into that tommorrow all being well.